
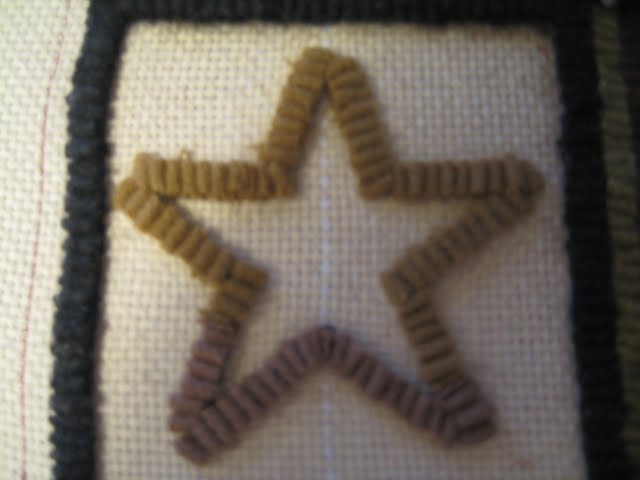
This lesson will be on how to hook the perfect star. Now before I tell you how to hook a star with perfect points I want to remind you that it is never a necessity to have perfect stars guys...Look at the old vintage rugs and you will see lots of rugs with rounded stars, mishapen stars, uneven stars and so on, so dont get too hung up on doing "The Perfect Star" in ever rug. Sometimes though, when the star is a key feature you do want nice crisp lines and points. There are lots of ways to do it out there, but this is the way I like best. I outline the star first with my background color and then fill it in....Here's how.
If you are following along with the rug we are making, "My Sampler Square", you should have outlined your box with your star with your trim color like this..


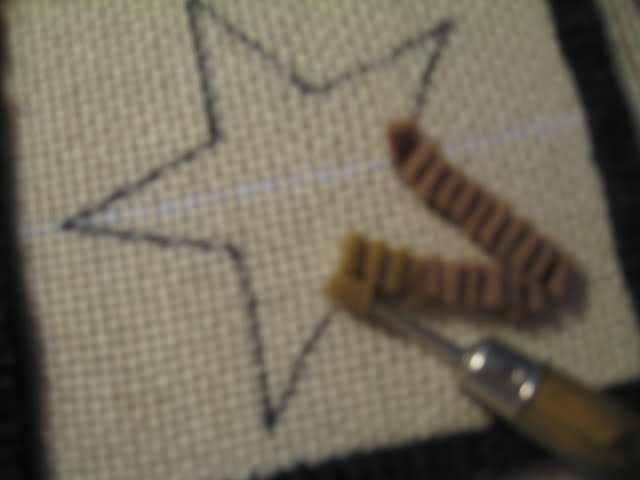
Now just go all the way arounf your star, adding strips as needed and it will look like this...


Once you have done all the stars you are done hooking your project ...You do have a few more steps to finish it, but for now give yourself a pat on the back ...you hooked a rug !!!
You will notice this mat is different than the one I did in Americana colors or the one I did in the rusts/beige/blacks. This was one I did with all LEFT OVER pieces of wool...little strips left over from other projects.I think it turned out pretty nice...

Ok...now the part most of us rug hookers dont like...finishing it !!! Today we are just going to get it ready for "finishing" which is called "blocking" and for this you need a damp cloth (I use a tea towel) and a hot iron. Be sure to check your mat and see if your hoops are all fairly even (nothing really out of line) and remove any stray pieces of thread. Place the damp cloth over the back side of the hooked piece and set your iron on the outside edge...DO NOT IRON, just lay your iron on each section and pick it up and set it on the next section until you have gone over the entire piece. Then turn the piece over and do the same thing on the front side. This will help your rug to lie flat and it also sort of "perks up" or "wakes up" your wool. Now set your rug someplace where the kids or pets (Or hubby) wont move it. Let it lie flat until dry...I usually let mine dry over night.
The next lesson will be on the different ways to finish your rug...There are MANY options out there for this, but I am going to show you the way I like best. But I will tell you about the other options too and you can decide how you want to finish your rug.
I got a HUGE bunch of wool the other day...

I also wanted you to see that pumpkin piece I showed you last week...the one where I showed how you can use scrap pieces of your foundation fabric (mine was monks cloth) and sew them on a smaller piece to make it fit your frame/hoop...Well, it's all done and I just have to block it and add my rug binding, but I really love it...Moral of the story...dont throw away those pieces of monks cloth !

Alrighty guys, until next time...
Grace to you,
Margie


Oh Margie,
ReplyDeleteI love the colors of the completed piece and the pumpkins! You are wonderfully talented!
Always,
Heidi
I am so enjoying this wonderful tutorial
ReplyDeleteThank you for sharing ..I look forward to the next lesson .
Mandy
margie, Love that pumpkin rug and all the pointers...I can't wait to have some me time to start my kit!!!! OLM
ReplyDeleteHi, Margie, thanks a bunch for all of these lessons.
ReplyDeleteJust a quick question, should steam irons be set to
"no steam" for the blocking. That pumpkin rug you did is my favorite.
Warm Regards,
Susan B., Western MA
Hmmmm...you're right...there's a bunch of different ways to do things out there - I don't do my stars that way, but I like it....see, even an old crow can learn a new trick....(not saying I'm gonna change my ways, mind you - I can learn a new trick, but it doesn't necessarily mean change comes easy!) ;o) Love your little pumpkin mat at the end too - but I think I win the "cracked" award for the week ~ where did you show the leftovers foundation thingy? I've done it before, but just wanted to make sure I wasn't missing anything I should know and - wow, I even went back through your recent posts and am not seeing it. I think I might have really gone and lost it this time....Happy Friday....Smiles & Hugs ~ Robin
ReplyDeleteWow Margie: I love this star rug made from all your scraps! the colors are superb! I received my wool, star pattern and monks cloth today....THANK YOU SO MUCH!!!! This monks cloth is much tighter woven than the one I bought...now I know what you mean...I also adore your pumpkin rug too-The star tutorial is fabulous...I really APPRECIATE all that you are doing for us newbies!!
ReplyDeleteThank you again!
Hugs,
patti :)
Oh no Oh no, I am on a little mini vacation and we all know how public wifi is. It takes forever to do anything. I will have to play catch up when I get home. Thanks for tutoring us. This is fantastic.
ReplyDeleteThanks again
Kat
Another great tut Margie. I have all saved so I can refer to them. Thank you for doing these for us wannabees!
ReplyDeleteHave a great weekend.
Blessings,
Jean
Thanks for these tutorials. My one and only rug hooking project had stars that came out wonky, and I do know prim isn't meant to be perfect. But I like some perfection LOL
ReplyDeleteLove the pumpkin mat! I am so looking forward to Autumn.
Thanks for the tutorial! I know the next time I do stars they'll come out as nice as your!
ReplyDeletemargie, I so need to be done with pumpkins so I can start my rug!!! LOL!!! I will have your pumpkins done 2night!! YIPPEE!!! OLM
ReplyDeleteAnother great Tutorial... Got my bundle of wool scraps in the mail... boy oh boy are they nice. Thank you so much for being so patient while I got my Paypal all straightened out...
ReplyDeleteSabrina
Donde comprar las telas para hacer estas alfombras?
ReplyDelete